Front Desk Training Guide
Contents
GOALS
By the end of this session, you will:
-
Know the basics of how to work with a reservation
-
Know the basic day-to-day steps for managing reservation details
-
Know how to locate, preview, and print reports
CHANGES TO RESERVATIONS
Locate the reservation
There are three options for locating a reservation:
-
F-keys / Function keys

-
Find Res F3
-
Tape Chart F9
Open the reservation for changes
Modifying a reservation requires opening the reservation.
-
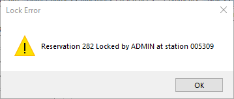
While the reservation is opened, the reservation is locked by that user
-
Other users are able to view a locked reservation but they are not able to modify the reservation while it is locked
-
A dialogue box will inform them when a record is locked
-
To modify a reservation:
-
Double-click the reservation
-
This opens the “All Detail” pane
-
-
Single-click to select, go to the Options panel, select Change Options, select All Detail
-
Use the shortcut Ctrl+Shift+C
-
The “All Detail” pane is displayed below:

-
Some of the labels on the left side of the screen can be customized
-
Drop-downs fields like Source of Business, Market Code, Housekeeping Services, Guaranteed, VIP and Comments are customizable
-
Values can be added or disabled

-
-
A pair of heads is the browse function
-
Provides ability to associate reservation with a different guest master/guest tile, CRM tile, group master or group leader
-

-
Blue links are clickable
-
They may provide additional information such as rate plan requirements, access to credit card details, package plan break out or applying additional charges such as cleaning or resort fees
-


-
Check-boxes such as Confirmation or Allow Move enables the option to auto-send confirmations or allow the reservation to move rooms.

-
Dates, Room Type, Room # and Rates are managed through special Rate related buttons located in the upper left hand corner of the reservation.

-
These changes can trigger a rate change or may affect availability
-
If there is a rate change the user will be prompted to Keep Old Rates or Use New Rates
-
Change tracking
Changes to a reservation can be tracked with the Change Tracking module.
-
The Changes tab will hold the Change Tracking logs, and can be accessed from the reservation
-
Changes for all reservations can also be found under System > Change Tracking > Analysis
-
Can use multiple variables, such as
-
LIFE OF A RESERVATION
Every reservation has a set of functions that will most likely be performed on it during the course of an individual’s stay. This is what we refer to as the “life” of a reservation. This section will outline these common functions.
Check-In
To check a reservation in:
-
Find the reservation using F3 (Find Res) or F6 (Arrivals)
-
From the Options Panel, select Check-In
-
Inventory check-ins will require that a room be assigned
-
This screen is the same as the Available Rooms screen (see Reservations outline for details)
-
-
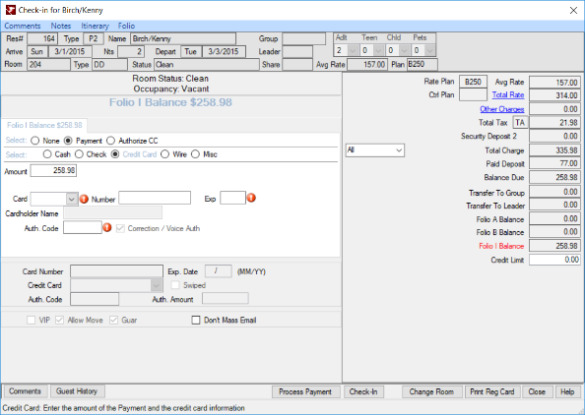
Verify Room Status as Clean and Occupancy as Vacant
-
-
You can also change the room at this point if desired
-
Once a room is selected, the Check-In screen will prompt to take a payment
-
Note that you do not have to do this, and can select None if payment is taken upon check-out
-
-
Click Check-in
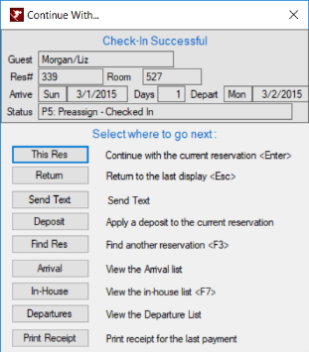
After a reservation is checked-in, the Continue With screen will appear, allowing you several options – such as staying with this reservation, or navigating back to the Arrivals screen.
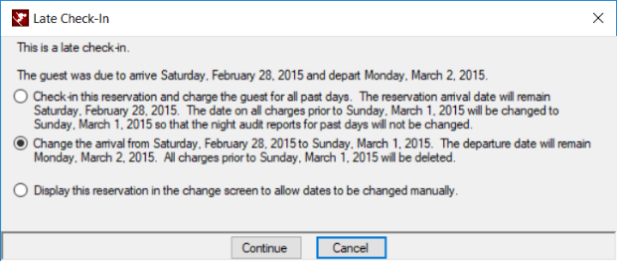
If your check-in is late, a prompt will appear asking how to handle charges. Depending on your property’s late policy, you can either choose to post the missed nights’ charges, or to change the arrival date and drop the prior nights’ charges.
Once the reservation is checked-in, you can locate it with the F3 (Find Res) or F7 (In-House) shortcuts.
Posting Charges
A reservation can have charges added and viewed in multiple locations.
-
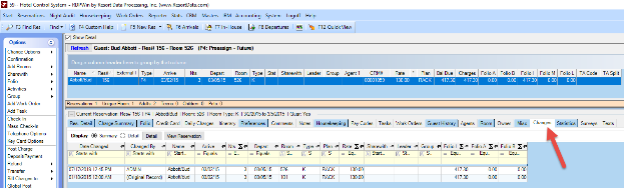
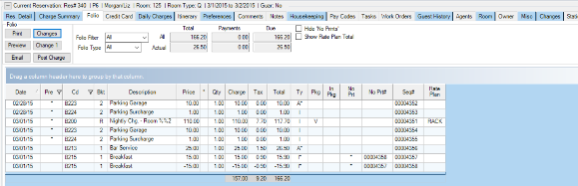
Folio tab: When a reservation is highlighted, click on the Folio tab to view a breakdown of the charges currently set towards a reservation
-
The following fields are the ones that you will most likely take note of on a daily basis:
-
Date: the date that the transaction was posted
-
Pre: the flag for if a charge was pre-posted
-
Cd: the code for the transaction (the first two digits indicate the ledger table, and the latter two indicate the tax code)
-
Bkt: the bucket (used to separate transactions for RDP purposes)
-
*: the override flag, indicating if a rate has been overridden
-
Ty: the folio that the charge will be posted in
-
A, B, I, M, L
-
Used mostly for groups and will cover in depth in that class
-
Can be used to separate details for a guest (work, spouse, personal)
-
-
No Prt: the No Print flag, indicates that a charge will not be included on the printed receipt
-
This is usually set for deleted transactions and corrections
-
No Print transactions can be hidden by ticking the “Hide No Prints” checkbox
-
-
No Prt#: the transaction number of the corresponding correction
-
-
The folio can also be filtered and viewed by the drop-down containing the following options:
-
All: all transactions, posted and pre-posted
-
Actual: only posted transactions
-
Pre-posted: only pre-posted transactions
-
-
-
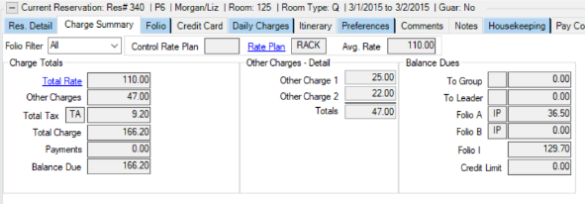
Charge Summary tab: This tab contains the rate plan information, other charges, and balance dues for a specific reservation
-
You can filter the folio by All, Actual, and Pre-Posted here as well
-
-
Post Charge: From either the Post Charge button in the Folio tab or the Options panel, charges can be posted to an account

-
Select from the drop-down or just type in the code if you know it
-
The description will auto-fill
-
You can edit the description and add information as needed
-
-
Enter in the price
-
A default amount can be set on the transaction code
-
-
Enter in the quantity
-
Indicate the folio type (which folio to post the charges to)
-
Two options for posting:
-
Post 1 & Close
-
No chance to review, so use with caution
-
-
Add to List
-
Useful if you’re posting multiple transactions or want to preview before saving
-
Save List will apply the transactions to the folio
-
-
-
-
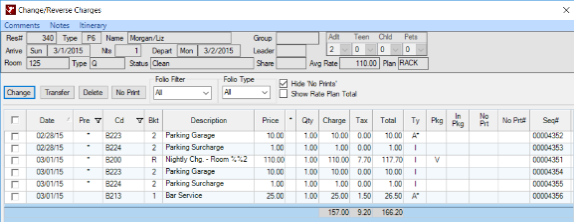
Change: If an error is made in a posted charge, the charge can be fixed through the Change option, found in the Folio tab.
-
The change options are as follows:
-
Change
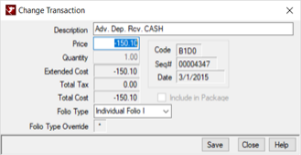
-
On posted charges, you can modify description, price, and folio
-
On pre-posted charges, you can only modify the folio
-
In some cases, changing a transaction will “reverse” the original and create a new transaction
-
Old transactions will be flagged as No Print
-
-
-
Transfer
-
Charges can be moved to another current or past reservation
-
Cannot send to a future reservation
-
-
Delete
-
Reverses off a posted transaction and both are marked as No Print
-
If the reservation is still due to arrive, it will completely remove the transaction
-
-
No Print
-
Flags transactions to not print on the folio
-
Net of selected transaction(s) must be zero
-
-
-
If a credit card is on file, two more options will be available:
-
Print Receipt
-
You can double click the transaction to print as well
-
-
Refund
-
Refunds a specific transaction, not merely an amount
-
-
-
-
Print, Preview, or Email Folio: If a receipt is required, either for accounting purposes or because a guest requested it, the options to print, preview, and email a folio are located in the Folio tab

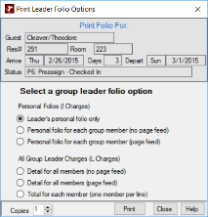
-
Select Folio (A, B, I, M, L)
-
If you select All Folios, can do as one report, or separate pages by Folio Type
-
-
Payments/Refunds/Transfers
Similarly, payments and refunds can be taken in several locations.
-
Deposit/Payment: The option to take a payment or authorize a credit card on a reservation can be made via the Options pane.

-
The static payment options are as follows: Cash, Check, Credit
-
Wire and Misc can be defined though the C1PAY5 and C1PAY6 switches
-
If entering a card manually, always get the CID and zip code
-
-
Refund: Refunding payments can be made via the Options pane

-
Note that a refund cannot exceed the payments made currently on the reservation
-
-
Transfer: Similar to transferring transactions, funds can also be moved from one reservation to another via the Options pane.

Bill Charges To
To move transaction charge amounts from one reservation to another, utilize this via the Options pane.
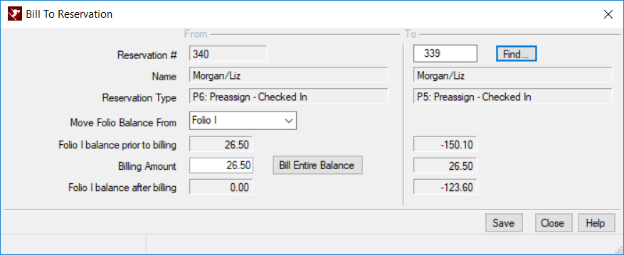
-
Commonly used for groups, but can be used to move balance from one reservation to another
-
Cannot be sent to future reservations
-
If back-to-back reservations, simply check-in the new one first, then can Bill Charges To
Check-out
When a reservation leaves, they are checked out via the Options pane.

-
Listed below are the notable sections on this screen:
-
Folio Balance: This is an easy indication of the remaining balance on a folio upon check-out
-
This section auto-updates upon receiving payment
-
Will change to say “No Money Due” if the balance is zero
-
-
Folio Options: On this screen, you can also preview, print, or email the folio
-
Charges can be added from this screen as well
-
-
Process and Check-Out: If a balance is present on a reservation, the Process Payment button will be selectable
-
You can also opt not to take a payment upon check-out and select the Check-Out with Balance button
-
This option can be password protected
-
-
-
There can also be an automatic prompt to print a folio upon checkout
-
Similar to a late check-in, an early check-out will prompt the user for options
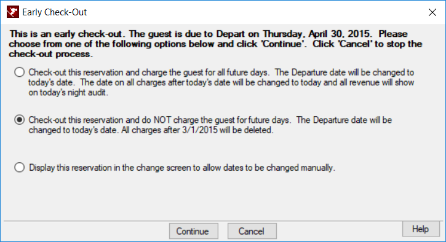
-
Charge for all future dates
-
Departure date is changed to today’s date, and all revenue shows today
-
-
Don’t charge for future dates
-
Departure date is changed to today’s date, and future revenue is removed
-
If not charging for future dates, the system will prompt to:
-
Post a room charge for just tonight (late departure fee)
-
Include in tonight’s statistics
-
-
-
FRONT DESK OPTIONS
The Options sidebar contains multiple other ways of working with reservations. Listed below are the options covered in this session:
Change Options
This serves as another way to make changes to a reservation. You can choose from the options shown below:

-
All Detail will bring up the same screen as double-clicking on a reservation.
-
Room & Dates allows you to change the room type/number and dates of a reservation
-
Utilize the Availability button to ensure no conflicts or overbooking
-
There will likely be a rate change; you will either have to keep the old rate or change to the new one.
-

-
Folio displays the Change/Reverse Charges panel
-
Activity displays the Change Activity panel
-
This will be covered in depth in the Activities training session
-
-
Notes displays the Notes panel, where you can add or edit existing notes on a reservation
-
Group Reservations allows you to make changes to a group reservation
-
This will be covered in depth in the Groups training session
-
Confirmations
This option allows you to email or print a confirmation to a reservation after it has been created in the system.
-
You can access these confirmations from one of the following options:
-
The Options pane
-
Right-click a reservation and select Email or Print Confirmation
-
Folio
This option in the sidebar is simply another place to make changes to the folio. (See above sections for more details.)
Activities
Additional activities, such as ski passes and golfing, can be scheduled and added to a folio for specific days through RDP. This will be covered in depth in the Activities training session.
Group
RDP offers a group check-in and check-out functionality for smaller groups. This will be covered in depth in the Groups training session.
Add Work Order
Certain work orders – such as replacing a broken fixture – can be attached to a room and managed through the Options pane. This will be covered in depth in the Work Order training session.
Add Task
Tasks – such as delivering a requested item to a guest – can be attached to a reservation and managed through the Options pane. This will be covered in depth in the Work Order training session.
Mass Check-in
This option allows for the check-in of multiple reservations at once.
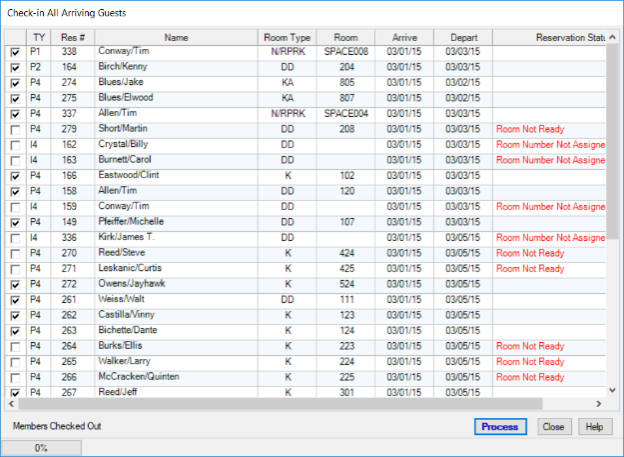
-
Generally, this option is not used, and should be disabled as a result
-
You cannot check someone in if their room is not ready!
Telephone Options
This requires the RG (Phone Actuator) module.

-
This allows for some phone console options directly through RDP
-
Can be helpful if you are not stationed near the console
-
These options depend on the phone switch
-
However, this can also add another layer of failure potential
-
Key Card Options
This requires the RY (Key Card Interface) module.
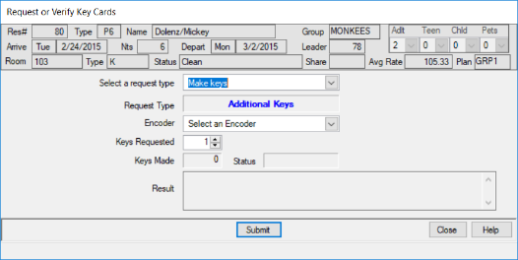
-
This allows you to activate room key cards through RDP
-
Can help with streamlining the check-in process
-
Global Post
Like mass check-in, this is another rarely used option, and it requires special training for proper use. If you do not frequently use this option, it should be disabled.
Mass Check-out
This option allows you to check-out every reservation set to depart on a specific day.

-
Generally, this option is not used, and should be disabled as a result
UnCheck-Out
This option allows you to undo the check-out of a reservation.

-
Instances when this could be used are as follows:
-
If a reservation was mistakenly checked-out
-
If a guest comes back and wants to extend
-
In this case, it’s usually just easiest to make a new reservation
-
-
Convert Res Type
If you need to change the type of reservation – for example, from a preassigned to an inventory – this option allows you to do so.
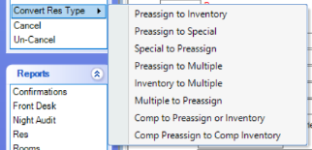
-
This is used if you have mistakenly created a reservation in the wrong type
-
Reservation types can be found under the F4 Custom Help shortcut
Cancel/Un-Cancel
In the event that someone decides to cancel their reservation, this option allows you to cancel a reservation that has not yet been checked in. Similarly, if a reservation has been incorrectly cancelled, or a correction needs to be made, a cancelled reservation can be un-cancelled as well. This will be covered in depth in the Reservations training session.
Text communication
When configured, this option allows you to send status updates to guests as text messages.

-
This requires the “mobile number” and “carrier” fields in the reservation details to be filled out
-
The system can also auto text when room is ready if Guest Waiting is enabled
-
The Waiting button must be checked on reservation
-
Room status must be changed to Clean by RDPWin
-
This does not work through the maid interface
-
-
PRINTING REPORTS
Access reports
To access RDP’s reports, go to Reporter > Reports and select the appropriate folder.

-
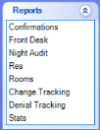
Alternatively, the left side panel contains a Reports shortcut menu
-
The options within correspond to the current screen
-
Select report
Once you’ve found the folder that holds the report you need, select the report by either single- or double-clicking.
-
Single-clicking will bring up the report description in the Reports Description panel
-
Double-clicking will open the report preview and allow you to view the report
Parameters
Some reports will contain parameters – such as a date range or a reservation number. An example is shown below:

-
If a report requires parameters, they will likely need to be filled in
-
Default options can be configured and selected
-

-
The report preview screen allows you to:
-
Export the report
-
Print the report
-
Refresh the data in the report
-
This usually requires you to re-enter the parameters
-
-
Move through the pages of the report
-
Find text in the report
-
Zoom in or out of the report